Another month has gone by and it's time to share what's been done to the car in the
last 30 days. While not a lot of construction progress was made, a lot of important
decisions were and that's a major part of any project.It's
been just plain too to work in the
garage. Our temperatures have been hovering around 100 degrees and the garage feels like
an oven. This has given me time to sort out a few areas of the car that need thought. to work in the
garage. Our temperatures have been hovering around 100 degrees and the garage feels like
an oven. This has given me time to sort out a few areas of the car that need thought.
For example, the alternator mount needs to be relocated and
redesigned and I think I've come up with a simple solution.
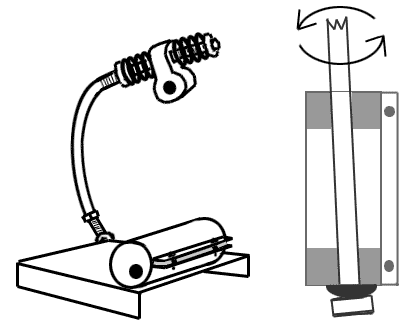
One of the problems with the previous design was that there was
little or no adjustment of the angle of the alternator in relationship to the pulley. I
wanted to design a mount that would allow the alternator to swivel as if it had a ball
joint and incorporate a spring loaded tension adjuster to keep a constant pressure on the
belt - no matter how much the engine moves.
The top springs will come from another stainless radiator
mounting kit. The piece between the springs will be machined from aluminum and will be
able to slide on the shaft in either direction. The arc of the adjuster arm is exaggerated
in this drawing. It will only need a slight arc to clear the side of the alternator.
Moving the springs and adjusting the lower heim joint will set the tension.
The lower mount will consist of a "plug" in each
end of a tube with an offset hole (eccentric cam). These cams will be locked in place with
a pinch opening in the tube. The alternator can be freely rotated to align it with the
pulley and tightened down. The plate will mount to the frame as it was originally designed
but the lower alternator mount is now at the top of the bracket and the adjusting arm is
mounted several inches away at the bottom of the mount. The mount will position the
alternator directly behind the inner fender panel so it will be higher and further away
from the engine but still hidden from view.
I'm going to run this design by Maury at MRI Machine to see
what he thinks. I'm sure he'll come up with some ideas on how to improve it - he has that
gift. I think the general idea will work and look forward to his input.
On the back burner:
I still need to continue with the roll cage but I have to decide how I want to
tackle the tube that runs under the dash. I'd like to hide it but it will mean the lower
dash valance will hang a couple inches lower. If I make it visible, I'll need to figure
out a way to make the removable connectors look nice. Hiding it is sounding better all the
time.
The fuel lines are here and I've started running them - sort
of. They haven't been cut or clamped yet because I'd like to install them once (actually
twice if you count tearing the car apart again to paint it and final assembly). The other
reason for dragging my heals on the fuel lines is because if I get far enough on the roll
cage I can weld some mounts on the fuel tank to attach it to the cage. Then I can safely
install the fuel level sensor and gas it up for it's first firing.
I think the fuel line Articles should be interesting. We'll
be installing our own ends on the braided lines and running a bulkhead through the floor.
All the fuel lines and fittings came from Pure Choice Motorsports - Neat Stuff! I
can't wait to get that far along. It's definitely some functional eye candy!
Speaking of taking stuff apart again... almost everything on
the car, with the exception of the front spindles, brakes and engine has only been
tightened down "finger tight". That's why you haven't seen things
tightened down in most of the Articles - it hasn't been done yet. I put a nice scratch in
the frame with the radiator the other day so now with that and the damage the leaking
master cylinder (yet to be replaced) has done, it looks like we'll be pulling the engine
and stripping the frame to repaint it after all. Fun.
Well, that's this month's update and guess what? I only wrote
about the car. That's a first! :) |